North American Signaling:
Automatic Block Signaling, AT&SF Single Track Overlap (original version)
Introduction
The most basic form of Automatic Block Signaling (ABS) for single track lines is the Overlap type ABS. The Overlap type ABS was later to a great extent superseded by the Absolute Permissive Block (APB) signaling which for most applications provided better traffic capacity and a more logical protection scheme against opposing trains. The APB, however, is also less flexible in situations with, say, short distances between sidings and with industries between sidings requiring switching by local freights. With Overlap ABS it is easier to tailor specific solutions to specific locations.
As with all other types of ABS The Overlap type comes in countless variations based on the needs of the railroad, the operating conditions and the traditions of the supplier. The source of the Overlap ABS in this document is a desciption in AAR's booklet series "American Railway Signaling, Principle and Practices", chapter XV "Automatic Block Systems", published 1935 (the booklet has later been republished with varying contents). The Overlap ABS is not referred to a specific implementation but it seems very identical to the ABS that was extensively installed on the original Atchison, Topeka & Santa Fe single track mainlines in the 1920s. A few sections of this installation remains almost 100 years later though most signal have been replaced with searchlights or color light signals.
In this document signals are illustrated by 3-position upper quadrant semaphore signals with black square-ended arms as was used on the AT&SF. The signal aspects shown in the illustrations are the ones that the ABS would command but the semaphore signal motors were slow acting and thus the response to a change would take a few seconds to manifest in the signals.
The signal indications on the AT&SF were somewhat different from what is standard today and what was used by other railroads at the time. The table below lists the signal aspects and indications used when the ABS was installed in the late 1920s, including some remarks on the differences from ordinary indications (sources are the 1909 rule book and a 1926 employee timetable). These signal indications later basically became the "System 1" signal system that lasted until around 1960:
| Signal Aspect |
Name |
Indication |
Remarks |
 |
Clear |
Proceed |
Proceed |
 |
Caution |
Proceed under control. |
"Under control" is defined as "The ability to stop a train within the distance track is seen to be clear", i.e. not as restrictive as "Restricted Speed". But the train is required to reduce speed immediately. |
 |
Stop |
Stop. |
The train is required to stop, if possible before passing the signal. If unable to stop before the signal the train shall back up to allow the signal to clear automatically. Failing this the train must send flagman ahead and proceed "under control" after 5 minutes. |
These signal indications differ from later standards but are essential to understand the workings of this type of ABS. In particular the yellow "Caution" aspect was different in that it required the train to immediately slow to a speed where the train can be stopped if the track ahead was not clear. Contrary to the more modern "Restriced speed" it did not set a maximum speed and it did not require the train to be able to stop within half of its vision. In addition, the train would not be required to be "under control" when passing the signal (since it might approach the signal on a "Clear") but it was required to slow down immediately. It seems from various accident reports that the AT&SF in those days left the actual judgement of safe speeds to the engineers rather than prescribe maximum permissible speed.
The "Stop" indication was also different from standards. On most other railroads red from a signal with a number board meant "Stop, then Proceed" (at restricted speed) but on the AT&SF it was a genuine "Stop" indication. Typically trains in ABS territory can come up upon signals near sidings dropping to red right in front of them if a meeting train shows up at the other end of the siding at the same time. While meeting an unexpected/unnecessary "Stop, then Proceed" aspect was inconvenient and would slow the train, the "Stop" indication was more restrictive and a cause of delays. The AT&SF ABS therefore took measures to minimize the situations where a train would have to pass a red signal (more about that in the "Sidings" section below).
The colored lights for night visibility were approach lit, i.e. the signal would normally be dark but light up when a train was nearby. The signal would light up at least when a train was within a mile of the signal on straight track and at least within sighting distance on curved tracks. In most cases the signal would light up when the previous signal was passed but in some cases where visibility was reduced the signal would only light up when the approach track circuit was occupied. Due to lack of reliable documentation on the approach lighting scheme the illustrations in this document show all signals as constantly lit.
The Overlap Principle
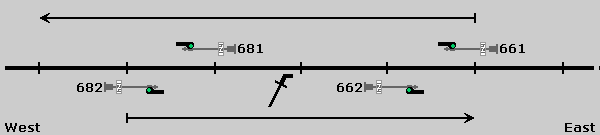
The most common layout of Overlap ABS placed the block signals in a staggered fashion, typically some quarter to half a mile apart. The controls for a signal (i.e. the track circuits that would place the signal at "Stop") of course extended to the far end of the block but also included the track circuit(s) up until the following opposing signal. In the example below the controls for signal 682 extended all the way to opposing signal 661 and vice versa. In addition, at least one of the block signals' controls further overlapped into its following block. In this case signal 661's controls extended past signal 682:
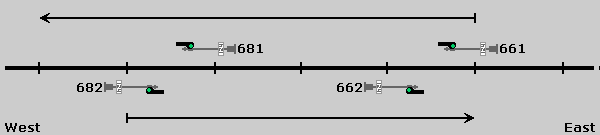
If two opposing train closed in on each other (which only happened at speed in case of a mistake by either the dispatcher, a train order office or a train crew) both signals protecting the block would be yellow. But the overlap meant than when the trains closed in on signals 661/682 at least one of them would be replaced to red:
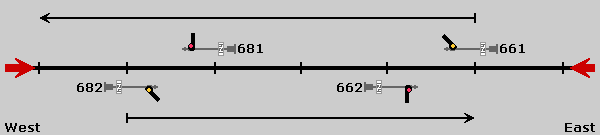
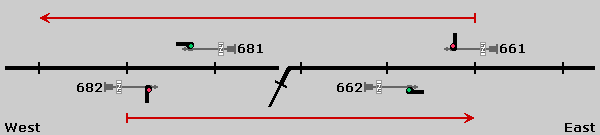
On most railroads this arrangement would mean that the westbound train would be required to stop and then proceed at restricted speed. But the eastbound would be allowed to proceed, slowing first to medium speed and then towards a stop at signal 662. This implies that in order to be safe from a collision the stopping distance of the westbound train had to be contained within the stagger distance between signal 661 and 662 (usually half a mile or less), which made this scheme unfit for higher speeds.
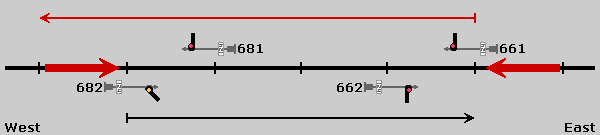
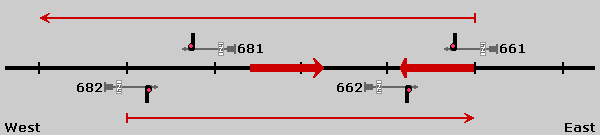
But on the AT&SF yellow meant "Proceed under control", i.e. the eastbound should reduce speed immediately and then be able to stop within the sighting distance. And the eastbound shall should be required to stop (and possibly back up, at least until a flagman has been sent ahead). This way even if the westbound continued past signal 662 before being able to stop, the eastbound train would be at a reduced speed already and be able to stop when it saw the occupied track. This allowed for somewhat for higher speeds and longer stopping distances using that same overlap scheme.
If a block contained switches, for example for a spur leading off to an industry, the ABS required that the switches were in their normal position. An open switch basically had the same effect on signals as if its track circuit was occupied. Switches leading from the main track to a siding generally were more complicated, see the section on sidings below. Special rules applied as to when mainline switches in ABS territory might be opened.
The AT&SF Overlap ABS line layout
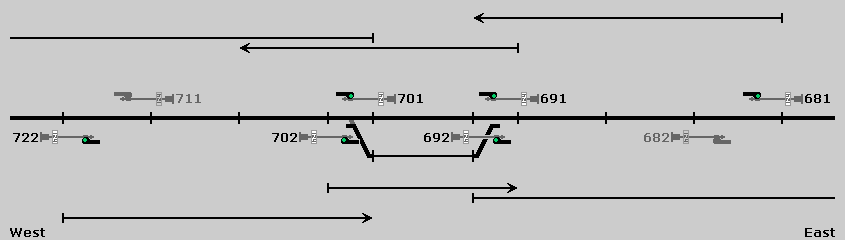
An Overlap ABS line was essentially a sequence of blocks like explained above. In the example below there are 3 blocks between sidings but it could be any number. The overlaps in signal controls were usually arranged so that signals for the direction of train superiority were not overlapped, while the signals for the inferior direction did include overlaps. In this ficticious example eastbound trains are superior to westbounds and thus the controls for signal 661 contains an overlap while the controls for signal 682 do not. This in theory allowed trains in the superior direction to run a little closer but in reality other factors prevented this (one such factor being that for practical reasons the overlaps for blocks bordering a siding needed to have their overlaps facing the open line):

To illustrate the signal controls consider an example where the track circuit leading up to signal 691 is occupied. The effect is that signals 681 and 692 both drop to the most restrictive aspect, i.e. "Stop". The signals on approach to 681 and 692, i.e. 661 and 702 respectively, change to "Caution" accordingly. 722 also changes to "Caution", but that is due to the "double yellow" being shown on approach to a siding (see later):

Sidings and their signal controls
The AT&SF Overlap ABS featured a somewhat sophisticated siding arrangement compared to most other ABS installations of the time. The siding switches were located between staggered pairs of signals. The signal controls were the same as explained above except they not only tested for vacant track but obviously also checked that switches were in their normal position. In most other ABS installations the sidings, including their switches, were contained between two signals facing each other (signals 692 and 701 below) but staggering the signals around the switches allowed for some mechanisms to optimize meets - more about that below.
Many siding switches were spring switches to expedite trains leaving the siding after meets. Due to the rules of eastbound trains being superior to westbounds of the same class, most meets would see the westbound take siding. It seems to have been common to equip the siding with a spring switch at the west end while the east switch was rigid. This configuration was chosen for the examples in this document. Sidings with two spring switches or 2 rigid switches were also found. Spring vs. rigid switches only bears a significance for trains leaving a siding.
The downside of this signal arrangement was that the siding block typically became significantly shorter than the other blocks and that the stagger distance was rather short (typically from the tip of the switch and slightly beyond the fouling point). Since part of the safety concept of the Overlap ABS was to use the stagger distance as (part of) a stopping distance it became necessary to warn opposing trains earlier. As with Absolute Permissive Block (APB) signaling the solution was to add another signal showing "Caution" before a siding, i.e. the "Double Yellow" feature:

With the "Double Yellow" the approaching trains would both be reduced in speed and prepared to stop, even if one of them might not need it:

Entering the siding
Placing the staggered signal pairs around the siding switches allowed for a special function to optimize meets. The function allowed a train to reverse its siding switch and pull into the siding while still upholding a "Caution" signal for the opposing train to enter the siding area. In the example below the meet is set up for the westbound train to take siding and if it arrives earlier than the eastbound the eastbound will be able to arrive to the siding area on "Caution" (signal 702) even while the westbound occupies the track between signals 691 and 692. To further expedite meets the ABS allowed signal 702 to stay up after the switch was restored - provided that only the switch track circuit was occupied when the switch was restored. The meet may therefore be executed quicker than if the eastbound had to stop and flag ahead from a "Stop" indication on signal 202.
Also illustrated is a rather unique AT&SF ABS function (at least the author has not seen similar elsewhere): Signal 691 shows "Caution" when the siding switch is reversed (and the switch track circuit is unoccupied). Other railroads would in this situation have left signal 691 at red (which would mean "Stop, then Proceed") but the AT&SF signal indications allowed that the signal could show "Caution":


In order not to create a situation similar to the "Double Yellow" in case a siding switch had been left open (which could could lure an engineer into believing the train was headed for the main track) the previous intermediate signal (in this case signal 681) would show "Stop" if the siding switch was reversed, thus requiring the train to flag towards the siding:

Had instead the eastbound train been the one to take the siding, signal 691 would have dropped to "Stop" on the westbound train until the eastbound reached the siding switch and reversed it. Then signal 691 would go back to "Caution". This was due to the asymmetry in the overlap between signals 691 and 702. The westbound train would only see signal 691 at "Stop" if it arrived more or less simultaneously with the eastbound, in which case it would have to wait for the eastbound to pull into the siding anyway. Rules of train superiority required the inferior eastbound train to clear the main track at least 5 minutes before the superior westbound arrived, minimizing the chance of the westbound encountering "Stop" in signal 691.


Leaving the siding
Leaving a siding in Automatic Block Signaling territory required the train to have authority to occupy the main track. Apart from that, in ABS territory there were also rules to directly assure that a train was not heading out into another train (whether either of them were there in error). After all a train in the siding was invisible to the ABS and the type of ABS discussed here did not provide specific protection against a train pulling out.
One method to assure a clear main track was to observe the block signals. If they were clear in both directions nothing was approaching from either side. After a meet - when an opposing train just went by - there was obviously nothing coming from behind. And observing the signal on the main track (signal 701) would indicate a free track ahead:

With a spring switch the train would simply pull out of the siding. Occupying the switch track circuit made the signals drop accordingly and after the train was clear of the siding switch - and the switch had restored - the signal behind the train would clear again. In the case shown only to "Caution" due to the eastbound train.


If instead the train was to leave the siding over a rigid switch the train crew would have to reverse the switch manually. The same rules applied regarding ensuring clear track but when leaving over a rigid switch the train would have to move forward and foul the switch track circuit first before reversing the siding switch. The rule of fouling the track circuit was added at a later date, possibly due to some incidents, but the exact reason is not known to the author. It is likely that the rule was intended to allow the train crews to observe a track circuit failure - at least in other situations the crew was required to observe the signals dropping to "Stop" as the train passed them:


Rounding up the description of siding functions an illustration of the difference between a reversed siding switch and an open siding switch (as would usually be the result of an equipment failure). Obviously a siding switch will be open a brief moment when operated between normal and reverse but the slowacting semaphore signal motors will bridge this timing gap:


An Overlap ABS line example
In order to illustrate the features of the Overlap ABS the following example shows a meet between a westbound and an eastbound train. The eastbound train is superior and will hold the main track while the westbound takes siding. First the westbound makes its appearance at the previous siding proceeding west. While in the siding block the train is protected by opposing signal 652 at "Stop" while signal 662 is at "Caution":

When the train passes signal 651 it enters the controls of signal 662 which drops to "Stop" and signal 672 consequently drops to "Caution". Once past both signals 651 and 652 signal 652 clears behind the train:


Similarly when the train passes signal 661/662 signal 682 drops to "Stop" (692 to "Caution") and signal 662 clears behind the train:


Signal 651 goes back to "Caution" once the train clears its overlap:

The train slows as it approaches the siding and stops before the siding switch. The eastbound train is not approaching yet so signal 691 is still "Clear":


The train crew then reverses the switch to the siding. Signal 691 drops to "Stop" when the switch is opened but reverts to "Caution" when the switch is in the reverse position. In reality the semaphore mechanism drops so slowly that the signal probably just dropped from "Clear" to "Caution". The westbound can now pull into the siding. Even though the switch is within the controls of signal 702 the special circuits at sidings allow signal 702 to stay at "Caution" with the switch reversed. The signal even stays up when the trains pulls into the siding and occupies the track circuit between signals 691 and 692:


Had the train just passed signal 691 and occupied the switch track circuit without the switch being reversed first signal 702 (and 691 for that matter) would have dropped to "Stop". But once the switch has been reversed signal 702 stays up even when the switch is returned to normal, as long as the track circuit is still occupied:

The westbound is now clear of the mainline and the track circuits and pulls to the west end of the siding waiting for the meet. Note that since this meet took place with the westbound - inferior - train taking siding, the eastbound would all the while have been able to continue all the way to signal 692 since signal 702 did not at any time show less than "Caution".
As with other types of ABS the train is invisible to the ABS as there is no track circuit in the siding. With the siding switch back to normal and the track circuits clear the ABS is now back to its normal state with all signals "Clear":

If the train taking siding is inferior by class (i.e. a lower class train) it must clear the main track at least 5 minutes before the superior train is scheduled to leave. For maximum efficiency as far as the ABS goes the westbound should clear the main track in time for signal 722 to change to "Clear" before the superior eastbound train sees it at "Caution", thus avoiding the eastbound having to slow down:

If instead the train taking siding is inferior only by direction (i.e. same class as the superior train) it must only clear the main track before the superior (eastbound) train is scheduled to leave. If the superior train arrives at the meet first its crew may reverse the siding switch for the westbound and allow it to enter the siding without stopping:


However the timing of the meet came to be, once both trains arrived at the meet they can proceed if they have Authority to do so. The eastbound train is on the main track and can proceed according to the indication of signal 692. The westbound train is in the siding and needs to ensure that no train is approaching on the main from either direction. Since it just met the eastbound nothing can be approaching from the east. And with signal 701 "Clear" nothing is approaching from the west either so the eastbound can pull out of the siding, trailing the spring switch:


Both trains are now on their way again, which concludes this description of AT&SF's single track ABS as installed in the 1920s. Thanks to Rex Seedig and Jon Roma for providing source documents and schematics to assist the research and to Rex Seeding for proofreading the document.
[Back]
[Home]
Text, Images, HTML: Carsten S. Lundsten.